Baby Shower

{ }
I am throwing a baby shower for a friend next month and I am so excited (I love babies and baby showers)! This is her 2nd child, however they are 10 years apart!! Her 10 year old is a boy and she just found out that she is having a girl this time and I am so excited for her! So I am working on some gifts as well as some decorations. Here is what I have so far...


Binky clips:

I purchased badge clips and removed the plastic piece from the metal piece.

Then I used my trusty hot glue gun to attach the metal clip to one end of a 6" piece of ribbon and used tacky glue to attach the plastic piece to the other end.


After that was dry I attached a cute, LARGE button to the end with the clip and ta-da!

These were very easy to make and turned out so cute!

Sweet Tooth

{ }


Guess what? More felt! Tuck your little one's tooth in the back pocket and put it under his or her pillow. Check the pocket in the morning and see if the Tooth Fairy left any surprises. This piece is about 4" tall.


I just cut a freehand tooth out of a double layer of white felt. I stitched bead eyes onto one of the felt pieces and stitched little eyelashes. Stitch on a smile and two pink felt circles for rosy cheeks. Put the two white pieces right sides together stitch all but a little opening for turning. Turn and stuff, then hand stitch the opening. I stitched on a little pink bow and sparkly bead to make it a girl. You can make a boy tooth, too.

Felt keychains

{ }


I told you I love felt. I have some more things to show. First, I appliqued a little design on a felt circle/square. Then, I cut a circle of really stiff interfacing and stitched the appliqued felt circle and a plain circle around the interfacing circle. I punched a hole and set an eyelet with my handy dandy Big Bite. I took a key chain off of something I wasn't using and put it through the eyelet hole. Viola!


Be my Valentine

{ }
My fifth grader decided not to pass Valentine's out at school. When I asked him why, he said he hated doing all that writing. I said, "I may have a solution for you." The first one turned out cute. We really went crazy for his teachers, though, and dressed him up as cupid. They LOVED it! Just take a picture with the hand closest to you, then punch a hole right above the hand and right below. Slide in a Dum Dum or Pixie stick and you are good to go. No writing necessary. I used half-sized photos to save photo paper and ink.


dress and misc

{ }


So I stopped at Walmart the other day on an errand. I just happened to mosey over to the fabric section. I picked up a cheap and easy dress pattern and some cheap fabric. I whipped up a little dress for my daughter and it turned out great. I haven't sewn anything for many years, so I was a little apprehensive. She was totally thrilled that I was making something for her to wear. I snapped a couple of pics. Also, I am not very good at incorporating the photos into my post. Please forgive me while I am learning.

Another bag!

{ }
I made this the other day:
This is the Phoebe bag, available here, for FREE! Thanks, artsy crafty babe, for an awesome pattern! It was super easy to put together. I used Amy Butler fabrics (again, I know. There was a sale, what can I say?). This time I paid attention to where the pattern piece was cut from the fabric to get the best effect. The fabric pattern runs vertically here, which is not how it comes off the bolt. So instead of using the fold that the fabric already has, I folded it the other way when placing the pattern piece on it. I also made sure to place the flap on a section that emphasized the orange.
The only change I made was to use a velcro closure with a decorative button and flower, instead of the magnetic button clasp the pattern calls for. I made this as a gift for a friend's daughter on her 6th birthday. Of course I tucked some money in the pocket on the inside!

Spring/ Summer Dress

{ }
From this...


to this!
I spotted these cute hand towels at Target and thought of this dress I saw a few weeks earlier! To make this cute dress, I just searched online for a pillowcase dress tutorial.

I can't wait until Spring!!


Also check out Blog Parties I'm participating in:

I Made It Blog Party


giveaways


Cute as a Bug

{ }
How is this for adorable?
I made this using my Cricut for the fabric applique. I used the Doodlecharms cartridge, selecting the ladybug using the blackout setting. The red fabric is the body, and the Dick & Jane dots fabric is the wings. Then I ran it through my sewing machine, using a tight zig zag stitch all around the edges of the fabric.

Here it is on our very own model, Sydney. Doesn't she look cute as a bug?!

Happy Valentine's Day

{ }
I made this felt heart wreath in honor of Valentine's Day. It's based on this tutorial I saw recently. I love how it turned out!


I just used a plastic cup as a template for the circles. I cut all the circles apart using a rotary cutter, then cut out the individual circles with regular sewing scissors while sitting in front of the TV.


Here is the wreath in progress. I used a foam form from Hobby Lobby. As stated in the tutorial from the link above, it took about 2 1/2 yards. Luckily I had about 3 yards of red felt from an odd lot I picked up via craigslist.


Easy peasy!

Paige's Apron

{ }
This is the apron I made for Paige using the Amy Butler fabrics that I also used in the portfolio project. This time I used the pink damask-like fabric for the main part, and the other green/gray/pink fabric is the pocket and the ties. Tres chic, no? I made the turtleneck, too.


And here we are making cookies! I don't like to make cookies as much as other things, because the actual baking part is too much of a pain in the butt. I'm not much of a cook/baker, but I do get the bug to make something once in awhile. These were from this recipe, and they turned out wonderfully! We used mini M&Ms instead of chocolate chips. We only made half a batch, which was plenty. As you can see from the picture, I do not need cookies in the least!

Also, I do have an apron for me that I made myself, but it's downstairs and I didn't feel like fetching it so I just wore this one from Williams Sonoma.

Inspiration

{ }
I just found this, and I am in love! Sticviews lets you create wall decals using your own designs! I've been wracking my brain trying to figure out how to decorate my daughters' room. We moved our office out of this room last year, and got as far as putting up a chair rail and painting the bottom half aqua blue. We did this before we got pregnant with daughter #2, so we wanted something that was fairly gender-neutral. When we found we were having a girl, I made a quilt for her using fabrics that have an aqua background with beautiful large pink flowers. Since then I've made valances that match the quilt, and I'm working on curtains right now. But the walls? Bare. Completely bare.

The quilt and window treatments:


I've searched all over for wall decals that I really love, but I can't find anything that really captures the look I want. And now, I don't have to! Design your images, or find some copyright free ones (and since I want a vintage look, that shouldn't be hard), tell them how big to make the sticview and you're set! Can you tell I'm excited about this?

The real shame in all this is that I have a degree in interior design, people! You'd think I could have come up with something before.

Brand new bag

{ }


I made this bag recently after seeing one my mom made. It's the Amy Butler Field Bag & Tote. I made the "bag" version, which just means it has a zipper closure along the top. The bag is bigger than it looks here -- it's kind of beach-sized, rather than purse-sized, if you will.


I made mine from a Riley Blake line of fabrics. My favorite is the one with the white background, but I couldn't make the main part of the bag in white! Can you imagine the stains? So I paired it with the cutest green and yellow fabrics -- I especially like the yellow as the lining. With pockets, no less!

This bag was definitely a stretch for my skill set. I've only done zippers 3 times before, and those were in clothing, which was much easier. It was the first time I've shortened a zipper, made and used piping, and made pleats. All in all, I'm very happy with the results. I'm using it as a diaper bag/purse whenever I go somewhere with the girls!

FYI: My mom made hers from polka dot fabrics: black with white where the green is on mine, white with black on the top, and red with white for the lining and piping.

I Have Felt Love

{ }


I have been on a big felt kick lately. I think it's because felt is so easy to work with. It doesn't fray, so you can just cut a button hole and not have to machine stitch one. It seems like we all have an aversion to button hole making. I have never been very good at it. Felt is also very forgiving.I am showing a sampling of the gift card/ipod/cellphone holders I have made. I have several more listed on etsy.
They are so easy to make. You just cut two squares or rectangles, blanket stitch three sides together and then do a blanket stitch along the top of each piece separately for a finished look. Cut a little slit for a button hole and sew a button on the inside of the back piece at the same spot as your button hole so that the button goes through the hole to the front. I love to incorporate the button as part of the design. For example, I made one with a cupcake and the red button is the cherry on the cupcake. I made one that is an apple tree and two of the red apples are the buttons.


That is the basic holder. If you want to applique, sew your design onto one of the felt pieces before you blanket stitch the two together. After I figure out how to post a video, I will provide a video tutorial on the blanket stitch and a couple of my fun appliques.


Green Projects

{ }

So I have been trying to green up my life a little lately and have found that repurposing things I already have can be a lot of fun and very inexpensive! I received a few hand me downs for my daughter that I otherwise would not have used. I have also found some inexpensive things (like onsies) in the dollar bins at Target and have raided my goodwill pile.

This onsie was cute but did not go with anything I had! It is such a busy pattern already and I thought it would be hard to find some thing just right so I added a few strips of gathered fabric and created ruffles on the butt. I think it needs more ruffles but here it is so far.


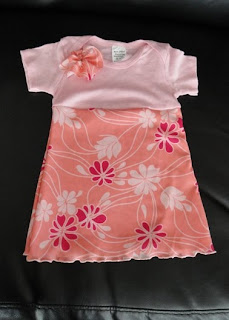
This cute dress was also once a simple onsie. I just cut it in half, added a skirt and cute little flower to tie it all together.


I will be doing more of these simple little projects and posting tutorials as well!


I know, I know you can't wait!


Dabble dabble dabble

{ }

Here's a little of what I've been up to lately...

This is the "sweet greetings portfolio" from Amy Butler. It's a free pattern available from her web site. Of course I used Amy Butler fabric to make it.


It has four little pockets on the inside, and a space to tuck a pencil in the middle. It uses chipboard to make the sides rigid, and you have to sew up the pocket that the chipboard slides into. It barely fit in my machine, so make sure you measure yours before attempting this! I used actual buttons instead of brads as called for in the pattern. Don't worry, they're not functional, so no buttonholes are required!


I made an apron for my toddler the day before yesterday out of the same fabric combination. I'll post some pictures as soon as I get them off the camera!

An introduction

{ }

Greetings, blogland! Allow me to introduce you to the Crafty Sisterhood. The sisterhood consists of three actual sisters: me (Wendy), Sarah and Lisa (aka 6birds2feed). Yes, Lisa does actually have 6 kids! 3 girls and 3 boys, to be precise. I have 2 girls, and Sarah just had her first child, a daughter, in December.

In addition to all being moms, we all LOVE to create things! Lisa is an expert scrapbooker, and lately has been making the coolest things from felt. Sarah's latest creations are altered onesies, such as adding a ruffle or three on the butt or putting a skirt on it from the cutest fabric. I'm currently working on a quilt, and just yesterday made an apron for my 2 year old. In other words, we're dabblers. And we're here to share our dabbling with you!